What is a rotary encoder menu?
These menus were geared around selecting between a small number of modes and incrementing values relatively slowly. We know that rotary encoders are a great hardware input option because they afford relatively fast input value changes while retaining fine control at slow speed.
How to connect a rotary encoder to an Arduino?
One of the two pins on one side of the rotary encoder (as opposed to the side with three pins) needs to be connected to ground and another to a digital pin on the Arduino. I have used D4 for the example sketch. If you choose a different pin, don't forget to change the value of buttonPin in the sketch. Next comes the code in Step 2.
What happens when I press the button on the rotary encoder?
If the button is pressed and the audio input selection has been changed by the rotary encoder, it sets that input to current and returns to the main page. Menu 3 - If the button is pressed but the tone control value has not changed it goes back to the main page as this is the last menu.
What is a rotary encoder for 3D printers?
This is really similar to the LCD controllers for RAMPS and Arduino MEGA 3D printers. The rotary encoder will allow me to scroll through the menu options, i.e. navigate the menu, select sub-menus and also change values within sub-menus/settings – very versatile for one hardware interface!

Step 1: Preparation
If you haven’t yet, please see my other Instructable on rotary encoder reading to find out how to set up your hardware and Arduino IDE software.
Step 2: Code
This is the code. By looking at the structure and the comments I hope you will find it easy to adapt for your specific needs!
Step 3: Operation and Conclusion
If you open the serial monitor in Arduino after uploading this sketch, and start to turn the encoder shaft, you should see the top level menu rotating through the number of sub-menus/options you have (limited using the modeMax variable).
multiple encoders
Try out http://code.google.com/p/adaencoder/ and PinChangeInt library ( http://code.google.com/p/arduino-pinchangeint/) see...
Raspberry Pi menu for rotary encoder
When using the Raspberry Pi as the menu display system we need to do a few things to a stock raspbian install...
Interactive Menus for your project with a Display and an Encoder
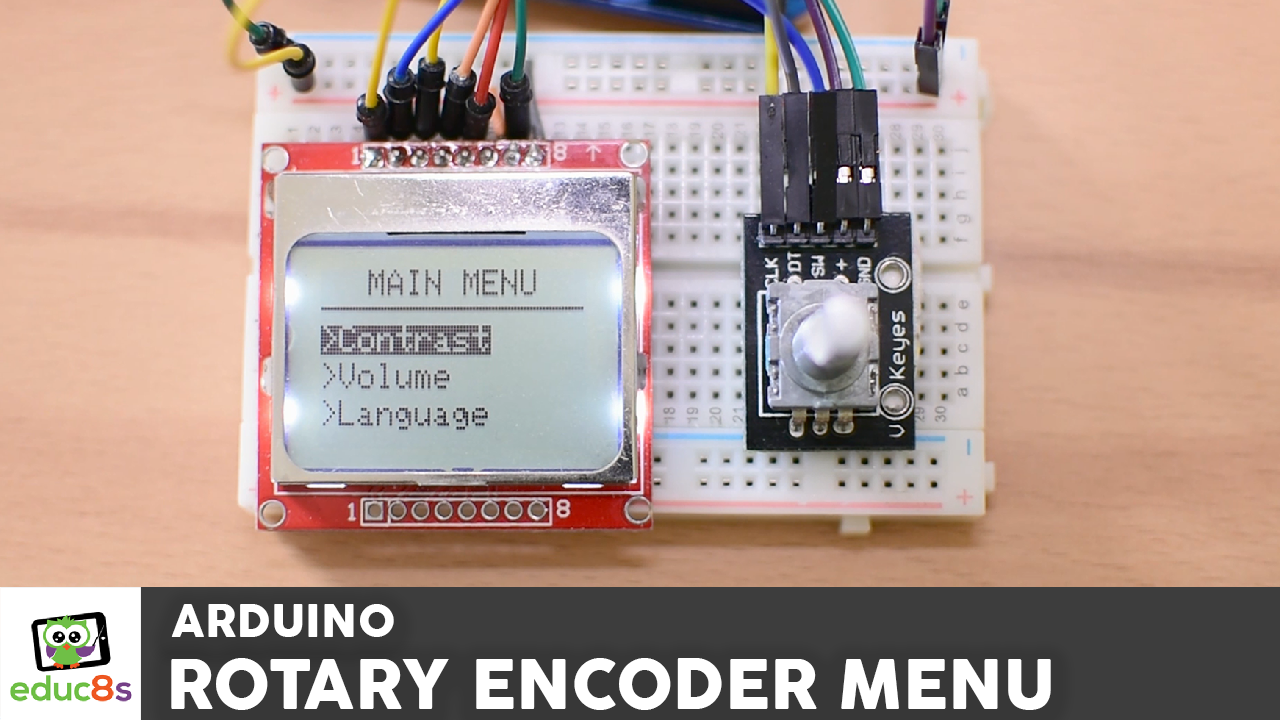
Ever wondered about how simple an User Interface (UI) for your next electronics hack or project be? Indeed, and you should also seen the humble rotary encoder and a Display as UI for 3D printer or other gadgets. In this tutorial we will look at building such a system with a Nokia 5110 display and a rotary encoder KY-040.
Hookup
The basic hookup will remain same during the entire tutorial. We will test the encoder first and then the display. You may want to hook-up all the things at once or do it step by step. The encoder first and then the display. I would recommend doing it step by step.
Encoder Basics
Encoders are great input devices which have infinite travel in both clockwise (CW) and anti-clockwise directions (CCW). What that essentially means is that the input range for your gizmo can be decided in software. As in case of your clock, the user may have to transverse a menu of say 8 items.
Display Basics
As said earlier I will be using a Nokia 5110 84x48 pixels graphic display for this tutorial. I will be using the well written Adafruit display and graphics libraries. The display is instantiated with the following pins.
The Code
The image below shows, exactly what we are trying to achieve. The Menu is stored in the memory as an array of character strings. The display can show 6 lines at one time. We would like to scroll through the menu, giving user an option to select one item at a time.
