

How to add a shape to a slide in PowerPoint?
How to fill a balloon in PowerPoint?
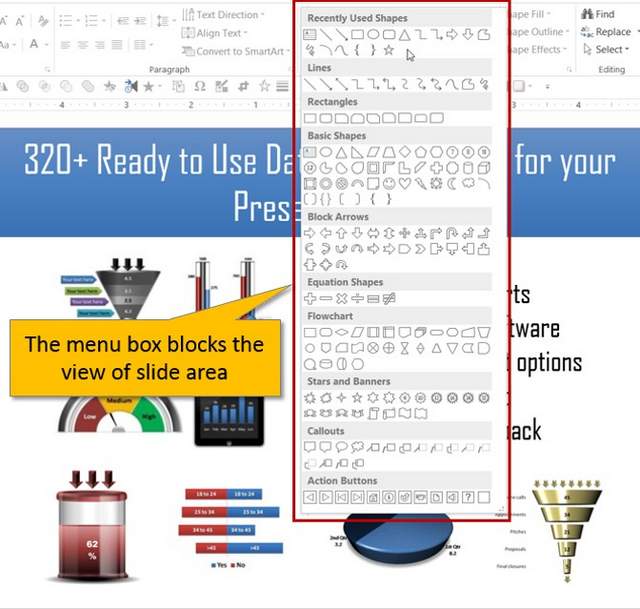
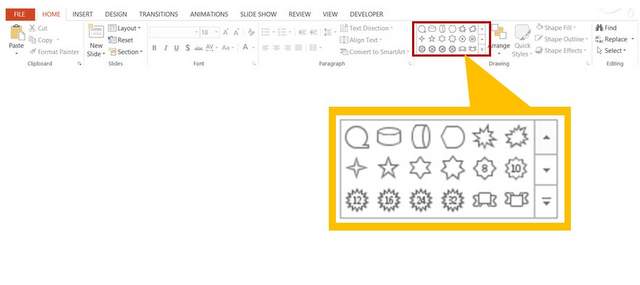
Where is the AutoShapes menu in PowerPoint?
Click Insert Pictures AutoShapes....A small AutoShapes toolbar appears.Click the various options, and a list of AutoShapes appears.Choose the one for your presentation.To format an AutoShape, right-click it and choose Format AutoShape.A dialog box appears with various formatting options.
Where is AutoShapes in PowerPoint 2019?
Creating Auto Shapes in PowerPoint: To create an auto shape, go to the Auto Shapes menu and click on any of the shapes. Your cursor will turn into a cross. When you click on the slide, the point becomes the anchor for one corner of the shape.
Which tool is used to add AutoShapes in your presentation?
Insert AutoShapes by clicking the Drawing toolbar at the bottom of the PowerPoint screen.
What menu bar where you can click to add AutoShapes in your document?
To add an autoshape in the Document Editor,switch to the Insert tab of the top toolbar,click the. ... select one of the available autoshape groups: basic shapes, figured arrows, math, charts, stars & ribbons, callouts, buttons, rectangles, lines,click the necessary autoshape within the selected group,More items...
Where is Autoshape in Word 2016?
Select a desired shape within the document, and then click Format > Format Autoshape. The Format Autoshape dialog box will appear. Note that the tab in the dialog box differs according to the selected object.
What are AutoShapes in images?
AutoShapes is a tool to help you draw objects on your document. You can choose to have an AutoShapes toolbar or use the AutoShapes menu on the Draw toolbar. Once you insert an AutoShape, you can also put a Text Box inside it, or other shapes. You can move or resize them as you wish.
Which tab contains AutoShapes?
To use an AutoShape in your document, click the AutoShapes button on the Drawing toolbar. (If it's not already open, choose View → Toolbars → Drawing.) Or click the Toolbox button in the Standard toolbar and click the Object Palette's Shapes tab.
What are the step by step process when you are inserting picture's and video in the presentation?
Insert a picture from your computer on a slideSelect the slide where you want to insert an image.On the Insert tab, select Pictures > This Device.Browse to the picture you want to insert, select it, and then click Open. After the picture is on your slide, you can resize it and move it wherever you want.
How do you add text or pictures to AutoShapes in word explain its steps?
Right click the Auto Shape and select "Add text" from the pull-down menu. A cursor will appear in the center of the object. Type the desired text and click enter. To change the text formatting, select the text and choose from the available text formatting options on the Home tab.
Where are AutoShapes found?
Displaying the AutoShapes MenuDisplay the Drawing toolbar. ... Click on the AutoShapes option on the Drawing toolbar. ... Position the mouse pointer over the bar at the top of the AutoShapes menu.Click and drag the AutoShapes menu away from the Drawing toolbar.Release the mouse button.
How do you draw with AutoShapes?
Working with AutoShapes: Drawing an AutoShape On the Drawing toolbar, click Autoshapes. From the submenu that appears, select the shape category you want » click the shape you want. Position your pointer where you want the shape to start. Click and drag the pointer where you want the shape to end.
How can you draw a shape from the AutoShapes?
To draw a shape, select one of the categories by clicking the Lines, Basic Shapes, Block Arrows, Flowchart, Stars and Banners, or Callouts button. From the resulting palette, click a line or shape and move the pointer onto the page. When your pointer turns into a cross, click and drag to draw the shape.
How to change text box in Autoshape?
Change the text box options. To add text to the shape, right-click the shape, and then click Add Text. After you add text, you can change the way the text appears inside the shape by using the options on the Text Box tab of the Format AutoShape dialog box.
How to rotate autoshape in Word?
Click Absolute and enter a size. Click Relative and enter a percentage. Then, in the relative to list, click Page or click the margin that the AutoShape size is relative to. Rotate In the Rotation box, enter the number of degrees to rotate the AutoShape in a clockwise direction.
How to add a gradient in Photoshop?
Gradient Click the Gradient tab to add a continuum of shades or colors.#N#Under Colors, click One color, Two colors, or Preset, and then click the colors or preset color combinations that you want from the list that appears.#N#Under Transparency, move the sliders to set transparency levels for each end of the gradient.#N#Under Shading styles, click the direction you want your gradient to flow.#N#Under Variants, click the version of the shading style that you want. You can see what it looks like in the Sample box#N#Select the Rotate with shape check box to retain the orientation of the gradient to the shape if you rotate the shape. 1 Under Colors, click One color, Two colors, or Preset, and then click the colors or preset color combinations that you want from the list that appears. 2 Under Transparency, move the sliders to set transparency levels for each end of the gradient. 3 Under Shading styles, click the direction you want your gradient to flow. 4 Under Variants, click the version of the shading style that you want. You can see what it looks like in the Sample box 5 Select the Rotate with shape check box to retain the orientation of the gradient to the shape if you rotate the shape.
How to reduce the size of a picture in Photoshop?
You can use the sliders to adjust the picture’s brightness and contrast. Compress Click Compress to change the image resolution to Print or Web/Screen. You can also check the Delete cropped areas of pictures to further reduce the size that the picture adds to the file.
How to add a pattern in Word?
Pattern Click the pattern that you want to use. In the Foreground list, click the color that you want to use for the pattern. In the Background list, click the background color you want. You can see a preview of the colors in the Sample box. Picture Click Select Picture, browse to the picture you want to use, and then click Insert.
How to keep orientation of picture in Photoshop?
To retain the orientation of the picture to the shape if you rotate the shape, select the Rotate with shape check box. Transparency If you want to be able to see through your shape, you can use the slider or enter a percentage to set the transparency level.
Can you change the arrow size in Autoshape?
Special options for arrow shapes. If your AutoShape is an arrow, you can set the beginning style for the arrow and the ending style. Depending on the styles that you select, you can also change the size for the beginning and the end of the arrow. Top of Page.
How to add a shape to a slide in PowerPoint?
To insert a shape, start on the slide you wish to enhance. Click and hold on the AutoShapes button. Slide up to the category desired. Slide right to the specific shape desired. Release the mouse button. Now, either click on the slide or click and drag on the slide to insert your shape. If you click, you will get the default sized shape. If you click and drag, you can make the shape any size youwish.
How to fill a balloon in PowerPoint?
On the drop down box for color, select "Fill Effects". From here, select the "Picture" tab. Select a picture or graphic. PowerPoint will fill each balloon with the picture you select. You can achieve another picture-type effect by selecting the "Pattern" tab and selecting your picture or graphic for the pattern.
About Autoshapes

Change Size and Orientation
- Check out the thought balloon in the picture above. Notice that it is surrounded by a grey box with eight small white boxes embedded in it? These boxes are handles. They allow you to adjust the size of the shape in each dimension. The handles on the corners do a proportional change in two dimensions, the handles on the sides change only one dimension. Now, look for the yellow diam…
Adding Text
- Now, we need to know what the person is thinking. One way to do this is to add text to the thought balloon. To add text, right-click inside the thought balloon and select Edit Text. You can now type your text. The text will show up in your default text format. You can change the look of the text by selecting the text and choosing Font of the Formatmenu. Did your balloon change its size as yo…
Change Color and Edge
- Ready to complete the customization process? Next up is changing what is inside the thought balloon, behind the text. There are more fill and line options in PowerPoint than we could cover here. So, we will concentrate on the six options shown in this diagram: Each of these thought balloons was created by changing the options on the Colors and Lines tab from the right-click o…
More Stuff
- What if I want to reuse a shape? If you are going to use the same color and line style for many shapes, go to the properties page for the shape you wish to duplicate. At the bottom of the Color and Lines" tab, you will see a check box labeled "Default for new objects". Click this box and all future shapes will default to the setting on this tab. You can still customize them as you desire, …