
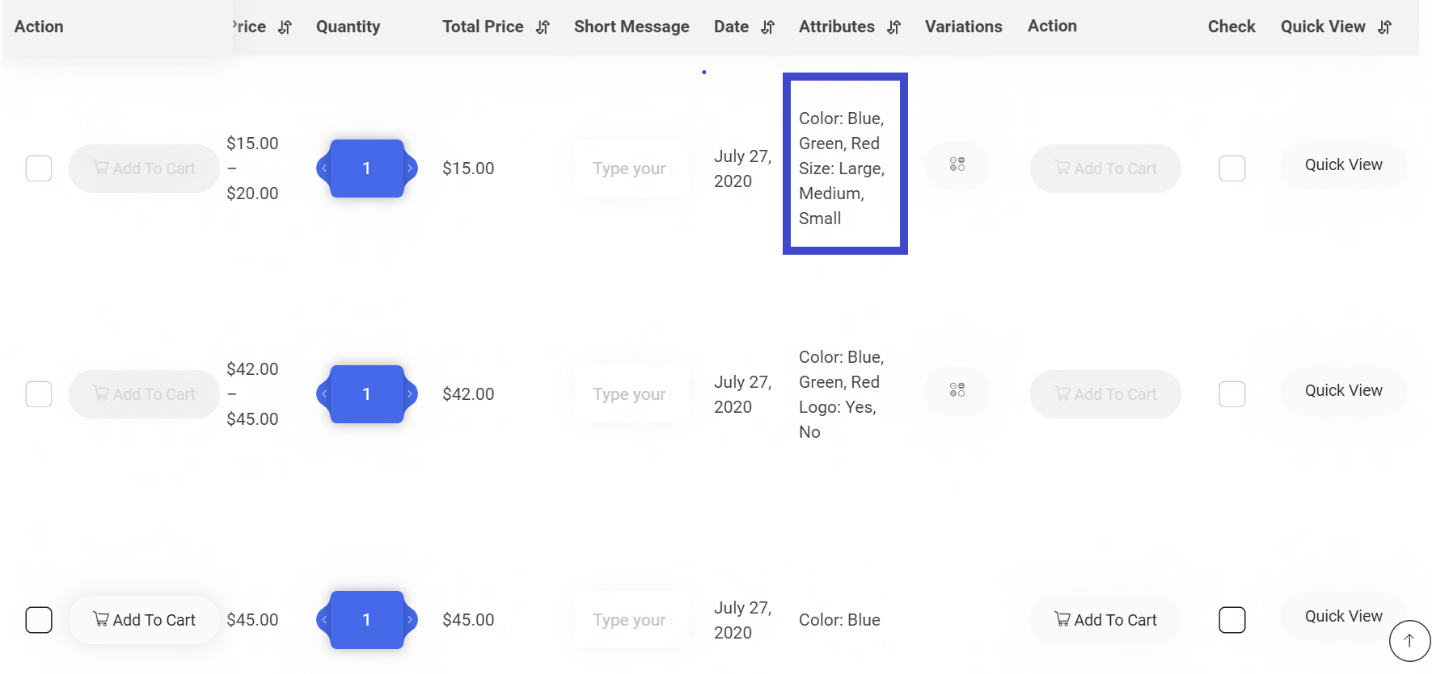
Enter your license key and choose the default options for your product tables. Make sure you include the add-to-cart column in the 'Columns' section, and select the variations dropdown option under 'Variations'. This will show your WooCommerce variations as dropdown lists in the add to cart column.
Full Answer
How to display WooCommerce categories and products in a dropdown list?
It's the perfect way to display WooCommerce categories and products in a dropdown list. Customers can view all products in the table and quickly select a category or sub-category from the dropdown. This instantly filters the list of products by category. The easy way to add category dropdowns to your product lists.
Can I display all products in a single dropdown list?
For sites with a very large number of products, it is not recommended that you display all products in a single dropdown because it would be both heavy on server resources and also just be difficult to use. What are some example uses of this plugin?
How do I create a product table with category dropdown?
The easiest way to create product tables with category dropdowns is to add a shortcode - [product_table] - to any page on your WordPress site. You can use the shortcode like this to list all products. Alternatively, you can edit the shortcode to list specific products only.
How do I edit the drop-down (select) field?
There you can drag and drop the ‘Drop-down (Select)’ field into the ‘Build your form’ box. You can edit the label, placeholder, class, name.
How do I add a drop-down menu in WooCommerce?
Go to WooCommerce → Settings → Products → Product Tables. Enter your license key and choose the default options for your product tables. Make sure you include the add-to-cart column in the 'Columns' section, and select the variations dropdown option under 'Variations'.
How do I add a drop-down menu to the navigation bar in WordPress?
To create drop-down menus in WP Admin, go to Appearance → Menus. Here, you can drag and drop an item in the menu to change its order. To create drop-down menus, drag individual items to the right to “nest” them under the item directly above it: You can undo this by dragging them to the left again.
How do I create a multi column dropdown menu in WordPress?
WordPress sub-menu items split in 2 columns. The easy way.Go to Appearance -> Menus and select the menu you want to edit.Type sub-menu-columns in the top menu item CSS Classes (optional) field. ... Click SAVE MENU button.WordPress assigns class sub-menu to the ul that holds sub-item li-s.More items...•
How do I create a horizontal dropdown menu in WordPress?
2:454:23Create A Wordpress Dropdown Horizontal Mega Menu Plugin 2017YouTubeStart of suggested clipEnd of suggested clipGo to pages see here word plus blog just now we have creator. Click this checkbox add to Meno whoMoreGo to pages see here word plus blog just now we have creator. Click this checkbox add to Meno who find the workers blog. Under many in the mini. Section.
How do you create a drop down menu?
Create a drop-down listSelect the cells that you want to contain the lists.On the ribbon, click DATA > Data Validation.In the dialog, set Allow to List.Click in Source, type the text or numbers (separated by commas, for a comma-delimited list) that you want in your drop-down list, and click OK.
How do I add a pop up menu in WordPress?
Method #1: Select the Popup from the Trigger a Popup DropdownFrom the WP Admin Area, navigate to Appearance -> Menus.Add or Edit a Menu Item.Select a popup from the drop down menu under the Trigger a Popup Label. ... Save the menu and refresh your site - the menu item will now trigger the popup!
How do I add a three line menu in WordPress?
1:352:53How To Add Menu Icons to your WordPress Site In Under 3 MinutesYouTubeStart of suggested clipEnd of suggested clipName its social click create menu then move to the next step add to custom links place your socialMoreName its social click create menu then move to the next step add to custom links place your social profile URL first and Link text second then add defeat them to the menu.
How do I style submenu in WordPress?
Head over to Appearance » Menus page in your WordPress admin and click on the Screen Options button. Once you have checked that box, you will see that an additional field is added when you go to edit each individual menu item. Now you can use this CSS class in your stylesheet to add your custom CSS.
How do I enable mega menu in WordPress?
InstallationGo to Dashboard > Plugins > Add New, then search WP Mega Menu and click Install Now.Upload 'wp-megamenu' to the '/wp-content/plugins/' directory.Activate the plugin through the 'Plugins' menu in WordPress.Click on the new menu item “WP Mega Menu” and setup your settings.
How do I create a menu and submenu in WordPress?
0:163:56Creating Sub Menu Items (Drop Down Menu Items) in WordPress - YouTubeYouTubeStart of suggested clipEnd of suggested clipFor this menu item on the front-end of the WordPress. Site. Once we've added in that link text I'llMoreFor this menu item on the front-end of the WordPress. Site. Once we've added in that link text I'll click on the add to menu button and notice how that menu item has been added to the menu structure.
How do I add a collapsible text area in WordPress?
Using The Ultimate Blocks Plugin Once you've installed the plugin, go to your WordPress post editor and click on the plus (+) sign to add a new block. Then search for 'Content Toggle'. Insert the block and then add the title of your collapsible/expandable text in the 'Panel Title' and add the main content under it.
What is an accordion in WordPress?
Accordion is a handy WordPress plugin which allows you to add beautiful accordions in your pages, posts, template files, and anywhere on your site using shortcodes. It has a responsive design and displays your content beautifully on all devices.
STEP 1
First, you’ve to go to the ‘All Forms’ section of Extra Product Addons in the Dashboard. Then the list of forms is displayed on your screen. On that page, click the ‘edit’ option of your form or for a new form, you can click the ‘Add new form’.
STEP 2
Then, the below-shown page will open. There you can drag and drop the ‘Drop-down (Select)’ field into the ‘Build your form’ box.
STEP 3
You can edit the label, placeholder, class, name. Also, you may add or remove the number of options based on your need. Then, check the required box.
STEP 4
Then, you need to save the changes by clicking the ‘Publish’ or ‘Update’ button on the right side of the screen. You must check that the Forms enabled on the Product data under the ‘Extra Product Addons’. Also, select the respective forms for the specified product.
STEP 5
Finally, visit your site’s product page. The drop-down menu will appear there!
Can you edit a shortcode to list all products?
You can use the shortcode like this to list all products. Alternatively, you can edit the shortcode to list specific products only. You can also add them to your main shop page, complete with product category dropdown. That way, customers can visit the shop homepage (or any product archive page) and use the category filter there.
Can you filter by category in WooCommerce?
The filter widgets that come with WooCommerce itself only let you filter by attribute, price, or average rating - but not category. To add a category dropdown filter widget, you'll need to install an additional WP plugin. We recommend the filter plugins by either BeRocket or WOOF.
Step 1: Enable WooCommerce Categories
Go to Appearance > Menus and expand the “Screen Options” section at the top right of the page. Enable “Product categories” and “Product tags”.
Step 2: Menu Setup
Create a Shop menu item then add your Product categories as sub menu items.
Step 3: Mega Menu Setup
Hover over the “Shop” menu item and click the blue Mega Menu button. Set the “Sub Menu Display Mode” to “Mega Menu – Grid Layout”.
Step 4: Adding Icons to the categories
In this step we’ll be adding custom icons to our WooCommerce menu items. This functionality is part of Max Mega Menu Pro. Users of the free plugin can choose dashicons instead.
Step 5: Styling the text
The text beneath each icon needs to be centered. We are using standard menu items to display the categories within the menu so we can use the options built into the Theme Editor. Go to Mega Menu > Menu Themes > Mega Menus and scroll down to the “Second Level Menu Items” section. Here you can set the font options.
PHP Snippet: Show a Product Category Switcher and Redirect Upon Selection
Please note in the “ location.href ” section you have to make sure you enter the correct permalink base for product categories, otherwise you will get error 404. In this case, I’m using the default product category permalinks, “ /product-category/ “.
Where to add this snippet?
You can place PHP snippets at the bottom of your child theme functions.php file (delete "?>" if you have it there). CSS, on the other hand, goes in your child theme style.css file.
Does this snippet (still) work?
Please let me know in the comments if everything worked as expected. I would be happy to revise the snippet if you report otherwise (please provide screenshots). I have tested this code with Storefront theme, the WooCommerce version listed above and a WordPress-friendly hosting on PHP 7.3.
Need Help with WooCommerce?
Check out these free video tutorials. You can learn how to customize WooCommerce without unnecessary plugins, how to properly configure the WooCommerce plugin settings and even how to master WooCommerce troubleshooting in case of a bug!
Search box
The search_box option controls whether to display the search box, and where to display it. Defaults to top. Choose from one of the following:
Reset button
The reset_button option controls whether to display the ‘Reset’ button above the table. Defaults to true. Set to false to hide the reset button.
Page length
The page_length option controls whether to display the “Show <x> products” drop-down menu, and where to display it. Defaults to bottom. Choose from one of the following:
Product totals
The totals option controls whether to display the product totals message (e.g. “50 products”). Defaults to bottom. Choose from one of the following:
Pagination buttons
The pagination option controls whether to display the pagination buttons and where to display them. Defaults to bottom. Choose from one of the following:
Pagination type
The paging_type option controls the style of pagination used for your product table. Defaults to numbers. Choose one of the following:
Footer
The show_footer option lets you show the column headings at the bottom of the table as well as the top. The default is false (i.e. hide the footer headings), but you can set this to true to show them.